Business
Ways to Calibrate Crane Scales Properly

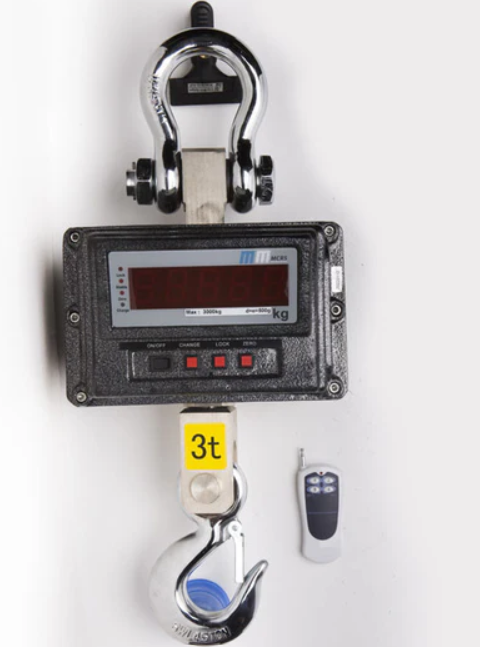
Crane scales are heavy-duty weighing instruments suspended from hoists, cranes, or overhead lifting equipment. They are used across industries from steel manufacturing and shipping ports to construction sites and recycling yards to weigh suspended loads safely and accurately. Because these scales operate under demanding physical conditions and often inform critical safety and commercial decisions, regular and proper calibration is not optional. It is essential.
Calibration is the process of comparing a scale’s readings against a known reference and adjusting it so that measurements fall within an acceptable margin of error. Without it, a crane scale can drift out of accuracy due to mechanical stress, temperature changes, electrical interference, or simple wear and tear. Here is a comprehensive guide to the proper ways to calibrate crane scales.
1. Understand Why Calibration Is Necessary
Before diving into the how, it is worth understanding the why. Crane scales are subjected to dynamic forces swinging loads, sudden shocks, vibration from machinery, and exposure to outdoor elements. Over time, these factors affect the internal load cell, which is the sensor that converts mechanical force into an electrical signal. Even a minor drift in the load cell’s output can translate into significant measurement errors at high capacities.
In regulated industries, calibrated scales are a legal requirement. Weights and measures laws in most countries mandate that commercial weighing instruments meet defined accuracy standards. Inaccurate crane scales can lead to overloaded rigging equipment, unsafe lifting operations, financial disputes in trade, and non-compliance penalties. Calibration protects people, assets, and business integrity.
2. Gather the Right Equipment and Reference Weights
Proper calibration begins with proper preparation. You will need:
- Certified reference weights — also known as calibration weights or test weights — traceable to a national or international standard (such as OIML or NIST). The reference weights should cover the crane scale’s intended working range, particularly the upper portion of its capacity.
- A stable lifting setup — a fixed overhead anchor point such as a beam or certified test frame from which to suspend the scale.
- A calibration certificate for your reference weights, confirming their accuracy class.
- The manufacturer’s calibration manual for your specific crane scale model.
Never use makeshift or uncertified weights for calibration. The accuracy of a calibration is only as reliable as the reference standard used.
3. Perform a Zero Calibration First
Before applying any test load, you must zero the scale correctly. This is sometimes called span zero or dead-load zeroing. With nothing attached to the lower hook of the crane scale, power on the instrument and allow it to warm up usually five to ten minutes for digital electronics to stabilise.
Once warmed up, engage the zero or tare function so the display reads exactly 0.00. This baseline ensures that the scale is not already carrying a pre-load error before the actual calibration weights are applied. Some crane scales also allow internal electronic zeroing through their software menu; consult your manual for the correct procedure.
4. Apply Calibration Weights Incrementally
With the scale zeroed, begin applying certified reference weights in steps for example, at 25%, 50%, 75%, and 100% of the scale’s rated capacity. Record the displayed reading at each step and compare it to the known reference weight value.
This incremental approach serves two purposes. First, it checks linearity whether the scale reads accurately across its entire range, not just at one point. Second, it identifies where any error is concentrated. A scale might be accurate at low loads but drift significantly near full capacity, which is the most dangerous range in lifting operations.
Document every reading carefully. Most calibration procedures require a written record as part of traceability requirements.
5. Adjust the Span if Readings Are Off
If the readings deviate from the reference weights beyond the acceptable tolerance (typically ±0.1% to ±0.5% of full capacity, depending on accuracy class), the scale needs span adjustment. On most digital crane scales, this is done through an internal calibration menu accessed via the keypad or a dedicated calibration button.
Enter the calibration mode as specified in the manual, apply the known reference weight when prompted, and input or confirm the correct value. The scale’s internal processor will recalculate the conversion factor for the load cell signal and store the new calibration. Repeat the incremental weight test to confirm the adjustments have brought readings within tolerance.
6. Test for Repeatability and Hysteresis
A well-calibrated crane scale should not only read correctly, it should read consistently. After the main calibration, test repeatability by applying the same reference weight three to five times and checking that the reading is identical or within one display division each time.
Also test for hysteresis: apply a load and record the reading, then remove the load and reapply it from zero. The reading should return to the same value. Significant variation suggests a mechanical or load cell issue that calibration alone cannot fix and may require professional servicing.
7. Schedule Regular Recalibration
Calibration is not a one-time event. Industry best practice and most regulatory frameworks recommend recalibrating crane scales at least once a year, and more frequently if the scale is used intensively, exposed to harsh conditions, or has suffered a shock load (such as a sudden drop or overload event).
Keep a calibration logbook for each scale, recording the date, reference weights used, pre- and post-adjustment readings, and the technician’s details. This log is your proof of compliance and your early-warning system for instruments that are drifting faster than expected.
Final Thought
Calibrating a crane scale properly is a disciplined process not a quick reset. Done correctly and regularly, it ensures that every lift is based on a measurement you can trust. In an industry where inaccurate readings can have serious safety consequences, that trust is everything.




Beekeeping is a rewarding activity that connects people with nature while supporting healthy bee populations and pollination. Whether you are starting your first hive or expanding an established apiary, having reliable equipment and healthy bees is an important part of responsible beekeeping. The right supplies can make hive inspections easier, improve colony management, and help beekeepers work safely.
For Australian beekeepers, choosing a Trusted Beekeeping Brand in Australia means looking beyond individual products. Quality, reliability, suitable equipment, healthy bees, and dependable service all matter when building a successful beekeeping setup.
From live honey bees and queen bees to bee boxes, protective clothing, foundation sheets, and other beekeeping equipment, selecting suitable supplies can give both beginners and experienced beekeepers greater confidence.
Why Quality Beekeeping Supplies Matter
A bee colony depends on a suitable environment to remain productive and healthy. The hive provides shelter, while frames, foundation, covers, bases, and other components help create an organised space for the colony.
Poor-quality or unsuitable equipment can make routine hive management more difficult. Damaged boxes, weak frames, poorly fitted components, or unsuitable protective equipment may create unnecessary challenges.
Quality beekeeping supplies are designed to support practical hive management. Strong hive boxes can provide durability, while well-made frames and foundation can help bees establish comb efficiently.
For beginners especially, starting with dependable equipment can make the learning process more straightforward.
Choosing a Trusted Beekeeping Brand in Australia
There are many products available to Australian beekeepers, but not every supplier provides the same level of quality or product knowledge. A Trusted Beekeeping Brand in Australia should offer products that are practical, dependable, and suitable for local beekeeping needs.
When comparing suppliers, consider several important factors.
Product Quality
Beekeeping equipment needs to withstand regular handling and changing weather conditions. Look for sturdy hive boxes, reliable frames, durable protective clothing, and properly made accessories.
Quality does not necessarily mean choosing the most expensive option. Instead, focus on equipment that offers useful features, suitable construction, and long-term value.
Range of Products
A supplier offering a broad selection can make it easier to build a complete apiary setup. Instead of purchasing individual items from multiple sources, beekeepers can often find essential equipment together.
Common products include bee hives, bee boxes, frames, wax foundation, bee suits, smokers, hive tools, feeders, and other accessories.
Healthy Live Bees
Equipment is only one part of beekeeping. The quality and condition of the colony are equally important.
Beekeepers looking for Live Bees for Sale Australia should consider suppliers that understand the importance of healthy colonies and suitable queen bees. A strong starting colony can provide a better foundation for learning hive management and developing an apiary.
Essential Beekeeping Supplies for Beginners
Starting beekeeping does not require every product available on the market. However, several essential items can make the first season safer and more manageable.
Bee Hive or Bee Box
The hive is the central part of the setup. It provides a controlled home for the colony and gives the beekeeper access for inspections and management.
When searching for Bee Hives Australia, consider the hive design, construction quality, available replacement parts, and whether additional boxes can be added as the colony grows.
Frames and Wax Foundation
Frames provide the structure where bees build comb. Wax foundation can help guide comb construction and create an organised arrangement inside the hive.
Beeswax Foundation Sheets AU are commonly considered by beekeepers who want a natural wax-based foundation option for their hive setup. Correctly fitted foundation can help encourage orderly comb development.
Protective Clothing
A suitable bee suit is an important safety item. Beginners should consider a full-body suit or suitable protective clothing, gloves, and a secure veil.
A good bee suit should provide coverage while still allowing enough movement to perform hive inspections comfortably.
Smoker and Hive Tool
A smoker is commonly used during hive inspections to help manage bee behaviour. A hive tool is useful for separating frames, removing components, and completing routine hive work.
These simple tools can become essential parts of an everyday beekeeping kit.
Buying Live Honey Bees in Australia
For people starting an apiary, purchasing equipment and bees often go hand in hand. A properly prepared hive provides a home for the colony, while healthy bees provide the foundation for future hive development.
When considering Honey Bees for Sale Australia, it is important to understand what type of colony or package is suitable for your experience level and local conditions.
A queen bee plays an essential role in colony development. Beekeepers interested in Queen Bees for Sale AU should consider the queen’s role within the colony, the characteristics they want to maintain, and whether the bees are appropriate for their beekeeping objectives.
Buying from an established supplier can also make the process easier for beginners who need guidance about setting up and managing a new colony.
Australian Conditions and Beekeeping Equipment
Australia has diverse climates, ranging from tropical regions to temperate and cooler areas. Beekeeping practices can therefore vary depending on location.
Hive placement is particularly important. Bees need access to suitable forage, water, and a relatively protected environment. At the same time, the hive should be positioned where the beekeeper can safely perform inspections.
Quality equipment should also be capable of handling local environmental conditions. Regularly checking boxes, covers, frames, and other components helps identify problems before they affect the colony.
Local seasonal changes can influence colony activity, honey production, feeding requirements, and hive management.
Building a Beekeeping Starter Kit
A practical Beekeeping Starter Kit AU can help beginners organise their initial equipment without overlooking important items.
A basic setup may include:
- A suitable bee hive or bee box
- Frames and wax foundation
- Protective bee suit and veil
- Beekeeping gloves
- Smoker
- Hive tool
- Feeder where required
- Suitable live bee colony
- Queen bee
- Basic hive maintenance supplies
The exact equipment needed will depend on the beekeeper’s experience, hive design, location, and management approach.
Rather than buying equipment simply because it is popular, beginners should consider how each item will be used. A well-planned setup can reduce unnecessary spending while ensuring the essentials are available.
How a Reliable Supplier Supports Beekeepers
A good supplier does more than provide products. Reliable information can be valuable, particularly for people learning how to manage their first colony.
A supplier that understands beekeeping can help customers make more informed decisions about equipment, hive setups, bees, and accessories.
hornsby-beekeeping supplies is positioned as a trusted supplier of live honey bees and beekeeping products in Australia. Its range can help beekeepers explore options for colonies, hives, bee boxes, protective equipment, wax products, and other essential supplies.
For beginners, having access to a supplier with a broad range of products can make it easier to develop a complete and organised apiary setup.
Maintaining Quality Equipment
Buying quality equipment is only the beginning. Regular maintenance can extend the useful life of beekeeping supplies.
Hive boxes should be checked for damage, moisture problems, loose components, or other signs of wear. Frames should also be inspected regularly and replaced when they become unsuitable for continued use.
Protective clothing should be cleaned and checked for damaged stitching, holes, or problems with the veil and fasteners.
Keeping equipment clean and organised can also make hive inspections more efficient.
Growing an Apiary Over Time
New beekeepers often begin with a single hive. As knowledge and experience increase, they may decide to expand.
Growing an apiary gradually allows beekeepers to become familiar with colony behaviour, seasonal management, equipment requirements, and honey production before taking on additional colonies.
When purchasing Beekeeping Supplies Australia, it can be useful to select equipment that is compatible with future expansion. Consistent hive components can simplify management when several colonies are involved.
Beekeepers may eventually require additional bee boxes, frames, foundation, protective equipment, feeders, and replacement components.
Making a More Informed Beekeeping Purchase
Before buying bees or equipment, make a simple checklist of your current needs.
Think about:
- Your experience level.
- The number of colonies you want to manage.
- Your local climate and environment.
- The type of hive you intend to use.
- The protective equipment required.
- Whether you need live bees or a queen.
- Which accessories are essential now and which can be purchased later.
This approach can help prevent unnecessary purchases and make it easier to build a practical beekeeping system.
Most importantly, remember that beekeeping is a learning process. Equipment supports the beekeeper, but regular observation, responsible hive management, and ongoing education are equally important.
Conclusion
Choosing a Trusted Beekeeping Brand in Australia can make a significant difference when starting or expanding an apiary. Quality bee boxes, frames, wax foundation, protective clothing, hive tools, and healthy live bees all contribute to a practical beekeeping setup.
Australian beekeepers should consider product quality, durability, suitability, supplier reliability, and long-term support when purchasing their equipment. Beginners can benefit particularly from starting with essential supplies and gradually expanding as their knowledge grows.
For those looking to source reliable beekeeping products and live honey bees, hornsby-beekeeping supplies offers a practical range for Australian beekeepers. Choosing suitable equipment from a dependable supplier can help create a stronger foundation for safe, organised, and enjoyable beekeeping.
Readmore:





When a tree is removed from your property, the job is not always complete once the trunk and branches have been taken away. The remaining tree stump can continue to occupy valuable space, affect the appearance of your garden, create a potential trip hazard, and make future landscaping projects more difficult. At Arborscape, we provide professional Stump Removal Services in Workington to help homeowners, landlords, businesses, and property managers safely deal with unwanted tree stumps.
A professionally removed stump can make a significant difference to the appearance and usability of an outdoor area. Instead of working around an old stump or waiting years for it to naturally decay, property owners can reclaim the space and prepare it for new landscaping, planting, lawn installation, paving, or other improvements.
Why Is Professional Stump Removal Important?
Tree stumps can sometimes appear harmless, particularly when they have been cut close to ground level. However, they can remain a problem for many years. As a stump begins to decay, it may attract insects, fungi, and other organisms. Its roots can also continue to occupy space beneath the soil, potentially interfering with future planting and landscaping.
An old stump can also become difficult to see when grass and vegetation grow around it. This can increase the possibility of someone tripping, particularly in busy gardens, walkways, communal areas, or commercial outdoor spaces.
Professional Stump Removal Services in Workington offer a practical way to eliminate these unwanted obstacles. Rather than allowing a stump to deteriorate gradually, professional removal gives you the opportunity to restore the area and use it for something more beneficial.
Improving the Appearance of Your Garden
One of the most obvious reasons to remove a tree stump is appearance. Even a carefully maintained garden can look unfinished when an old stump remains in a prominent position.
A stump can interrupt the clean lines of a lawn, take attention away from flower beds, and make a garden appear less organized. This can be particularly noticeable when you have invested in other landscaping improvements.
Removing the stump allows the surrounding area to be tidied and incorporated into the overall design of your garden. Once the work is complete, you may be able to replace the area with grass, decorative stone, plants, paving, or another feature that complements the rest of your property.
For homeowners preparing their property for sale, clearing visible stumps can also contribute to a more attractive and well-maintained outdoor environment.
Creating a Safer Outdoor Environment
Safety is another important consideration when deciding whether a stump should be removed. Stumps can create obstacles in areas where people regularly walk, play, work, or maintain the garden.
A low stump may be particularly difficult to notice, especially when covered by grass, leaves, or other garden growth. Children playing outdoors may not see it, while adults carrying equipment or maintaining the lawn could accidentally trip over it.
Professional removal can help eliminate this type of obstruction. Arborscape takes care to consider the surrounding area before work begins so that the stump can be dealt with using an appropriate method.

Cashmere Sweater Buying Guide What to Check Before You Buy

Bright Gate: Your Trusted Private Banking Solution for Modern Wealth Management

Buy Haircare Products in Kuwait: A Complete Guide to Healthy, Beautiful Hair

Transparent Pimple Patch: A Simple Approach to Managing Everyday Breakouts

Trusted Beekeeping Brand in Australia | Quality Bee Supplies

The Cortado: A Perfect Blend of Espresso and Milk

A New Culinary Haven Emerges: The News Café

Are Nut Thins Healthy? Unveiling the Nutritional Pros and Cons

A Step-by-Step Guide to Cleaning Your Nike Air Max Shoes